Sunday, 21 August 2022

FUN New Card kit - The Best Remedy

The Best Remedy is Ice Cream!

 At least that's what it says in this new card kit now available here in the UK. A fabulous new kit, which includes a set of clear photopolymer stamps as well as an ink pad, block and all you need for 9 fun cards.


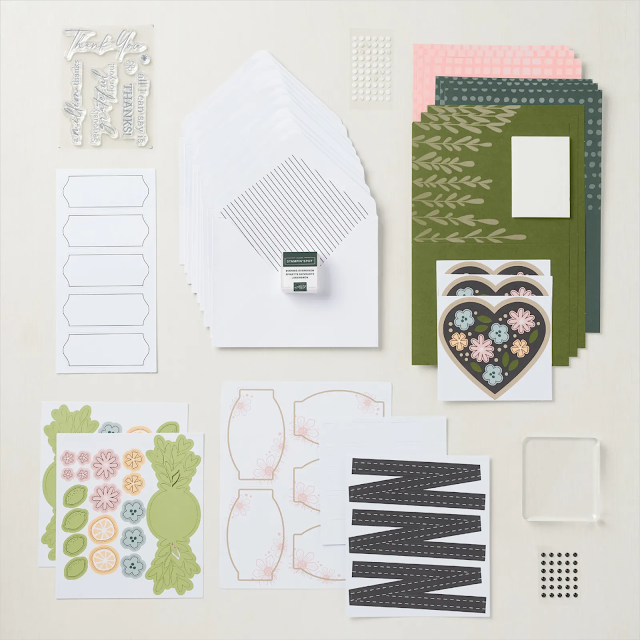
Perfect for sending to someone who needs cheering up as there are 3 fun animal characters, plus a skunk as part of the stamp set. Here are the kit contents:


This kit would be perfect for beginners to card making, as all the components are included, although it would also be fun for experienced crafters to make cards with.  There are pictorial instructions included. 

Here is a video of my original cards, designed as per the kit instructions:

I decided to turn one of the cards into a little gift box for my second review of this kit. It is such an easy, no glue box which you can make from any rectangular or square card base. Why not give it a go? No glue needed, but you will want some ribbon or string for the closure.

The gift box video is shown below. 


Even when you have finished making the cards, you will still have the stamps, ink pad, and block left over - so you could carry on and make more cards with the stamp set - I love the ice cream tub, flowers and ice cream cornet that the skunk can be holding.


I hope you like this fun kit - as always, kits are available whilst stocks last. You will find a link by clicking on the photos above or the graphic below - that will take you straight to all the kits that are CURRENTLY available. Why not take a look today. They make perfect presents too!


Read more »

Tuesday, 16 August 2022

Easy watercolouring for a sketched look on craft card.

 An easy card design in a few simple steps.

I love the look of a simple card with a light watercoloured image and the stamps from Stylish Sketches are just perfect for this technique.

These 2 fun animal images are from a stamp set whch you can earn for FREE with a qualifying order over £45 (UK) this month (ends 31st August or whilst stocks last).  Click on any image for more details.


There is also an image of figs and some foliage, and a super useful set of 'spots' (see under the fox).

I used our Crumb Cake (kraft) card as a base for the designs. and cut one side with the border dies from the Blossoming Happiness die set. As you can see from the photo at the top, there is a rounded design and a tabbed design -  I wanted them to look like we had torn them out of a sketchbook. You could also rip the edges of the paper even further to increase that torn look.

I stamped in Staz-On Jet Black ink, and used our watercolour pencils to apply colour in different areas. I love that we have a white pencil which is perfect for the fox highlights.

Our watercolour pencils are such a great price and come in 2 packs - there are no duplicates between the packs and all the pencils have the Stampin' Up! colour name printed on the side.

I then used our water painter to apply a little water and move the colour around. This is a great technique for beginner crafters as you don't need a lot of supplies. I used our Very Vanilla (ivory / cream) note cards and envelopes as our card base.

Here are the ducks from the same set:


If you would like to see how these were created in detail, just follow the video below
.

To see the main items I used in the cards, please use any of the direct shopping inks below. If you have any questions, please don't hesitate to comment and I will reply in due course. You can also email me anytime at jenny@jeminicrafts.co.uk

Product List
Read more »

Thursday, 11 August 2022

How to add multiple colours to a stamped image.

Using the Painted Pheasant stamp set

Join me as I make a simple card using the Painted Phesant stamp set from Stampin' Up! to create this thank you card.

Although we traditionally see pheasant imges on Christmas cards of course, here in the UK it is August and there are plenty of pheasants out in the fields around us in Brackley.

So I thought I would use this sweet stamp set to create a thank you card. As you can see, it has multiple colours - hopefully fairly representative of a male pheasant. I did Google an image to help me choose the colours.


To create this card, I used our Stamparatus, with the pheasant image on it, and inked up the stamp with our Stampin' Write marker pens. These are water based pens that contain a similar ink to that in our ink pads and are available in our colour families and our In Colours.

You can see the full details in the video below:

I used the wider brush end of the pen and added ink to the stamp, and then stamped onto our base layer, repeating and adding colour as required.

I used Shimmer White card for the stamped image, and layered this onto one of our Kraft Notecards and Envelopes. These come as a pack of 20 cards, complete with envelopes and a flat packed box you can use to gift or store your cards in.

The main items I used are listed below. If you have ANY questions or queries, please don't hesitate to comment or email me at jenny@jeminicrafts.co.uk

Product List
Stamparatus
[148187]
£45.75
Read more »

Wednesday, 3 August 2022

BRAND NEW CARDMAKING KIT - A Million Thanks

 This new kit makes 9 thank you cards

This is a perfect boxed kit to take on holiday with you and make yourself a set of 9 thank you cards. Follow the photographic instructions, or do your own thing! This kit includes a set of stamps, plus a block and an ink pad. If you are a beginner to cardmaking it is a great starting point, but this kit also works for experienced crafters as you can make the cards your own - add extra embellishments, stamped images or embossing.

 
All the adhesives are also included (glue dots and dimensional foam pads) - all you have to do is be able to open the packaging to start with. 

Mix and match the card bases, and or the die cuts - there are co-ordinating envelopes to match too.

At £20 (in the UK) this is a great value kit, as you will have the stamps (see below), block and ink pad in Evening Evergreen when you have finished the cards.


Here is a variation for you, hopefully you can see the embossed background. I switched round the base card as I love that pink background.

This is from our kits collection and is available whilst stocks last. It may be available in one country and not another, so please check with your local Demonstrator.

This kit was in stock in the UK at the time of posting.  You can also order this kit in French or German (the only things that are different are the stamps in the 2 languages).  To see our kits collection click on any of the photos.

Read more »

Monday, 1 August 2022

A week of Watercolour ideas - it's Watercolour Month in July

 Watercolouring made easy

July 2022 was Watercolour Month and so you will have seen many Stampin' Up! Demonstrators featuring watercolour techniques on their BLOGs and on Facebook and Instagram.

I was a little late to the game, as I have been concentrating on other products and Sale-a-Bration, but I did catch up this week with 3 different watercolour techniques!

Using Watercolour Pencils on Designer Paper

This was our first technique that we covered, and although we used designer paper - in this case Perfectly Pencilled; you could stamp some images first and then colour these in. You would need to use a waterproof ink such as Staz-On, or heat emboss with clear embossing powder over a water based ink such as Stampin' Up! Classic ink pad.  These were inspired by the lovely Patty Bennett from pattystamps.com in the USA.


Take your watercolour pencil of choice and just colour in part or all of your image, and then use a damp (not soaking) waterbrush, aquapainter or paintbrush dipped in water to move that colour around slightly.

This gives a lovely soft image, and is in fact the card design we used for coffee and card this week. To finish these cards we stamped the sentiment onto a small strip of white card, which we then punched our with our dual oval punch. The background scallop oval was punched out of the black card which we also used underneath the printed piece to layer onto a notecard.

Here are some more samples. You can click on either photo to see the video.

The Emboss-Resist Technique

Our second technique was the Emboss Resist technique - stamp your image onto watercolour or shimmer white paper using Versamark or similar ink. You then add white embossing powder and heat emboss the image. I then added some drops of our reinker onto a block and picked this up with a waterpainter and plenty of water - spreading this across the image.

In my sample below I used the Butterfly Brilliance stamp and then used the co-ordinating dies to cut out the coloured butterflies. These were then layered onto some of the Perfectly Pencilled papers.

Watercolour Block Technique

Our third technique was the watercolour block technique.  Ink up your acrylic block with some classic ink from an ink pad, and then spritz the block with water. Stamp this coloured block onto some watercolour or shimmery white card stock. Make sure you allow this design to dry before adding further stamps such as sentiments or images. You can see this technique in detail in the video below.


I was very pleased with how the sea scene came out - I had no idea that was what I was going to up end up with - and that's the fun of this technique.

I hope you like the card designs, do let me know your favourite in the comments section. Thanks for visitng today!

Product List

Read more »